Big shout out to nihonhacks.com for pointing me in the direction of past exam papers for the Japanese Language Proficiency Test.
Here you can download past papers for all levels going back until 1991 and here are mp3 files for the listening section.
It's not all good news, however, as I've noticed some of the listening files are virtually incomprehensible, presumably because someone simply snuck a microphone into the exam center.
At least for the other two sections I now have a lot more to practice on, and in my first attempt at 1991 I managed to answer a little over 60% of the non-listening questions correctly - I don't know if this translates into 60% of the marks as I wasn't sure of the marks breakdown - but with a pass mark of 60% things are looking promising. I've pretty much nailed the Kanji recognition and production but my grammar could use a lot of work, particularly verb and adjective conjugations.
Right now the thing I'm terrified of is the listening section. This is worth 25% of the total marks and I'm completely awful at it. My strategy for the coming days is to transcribe 2002's listening section as an exercise and compare it to Peter van der Woude's at the JLPT Study Page. Ideally what I need is transcripts of the listening sections for all of the past papers I've now downloaded but these seem impossible to get hold of.
I do still have the book of 2004 - 2006 exam questions and answers which does include the listening transcripts and, hopefully, high quality listening audio but I'm still aiming to hold these back until Sunday, with a week to go, and treat them as proper exam rehersals.
Thursday, 26 November 2009
Monday, 16 November 2009
JLPT Level 4 Update: 18 days to go...
It had been my intention to provide more frequent updates on my Japanese Language Proficiency Test revision but frankly I've been too busy actually revising to even think about updating my blog.
If you recall, I had planned on making Anki flash cards from the large collection of example sentences and short conversations found in The Preparatory Course for The Japanese Language Proficiency Test, Level 4. However, in hindsight I believe there are two problems with this approach:
If you're also studying for JLPT Level 4 I'm sure you're already well aware of Peter van der Woude's excellent JLPT Study Page which covers not just Level 4 but also Levels 2 and 3. This is a great resource for the official Kanji list and vocabulary that I'm using to help make my flash cards. I'm also a huge fan of the Denshi Jisho web-based dictionary.
With 18 days to go and plenty of work still to do, I have no real idea whether I'll be able to pull this off. The plan is to do as much prep work as possible before taking a look at the past papers from 2004 - 2006 when I have a week to go, which should give me some contingency if these past papers throw up any concerns. がんばって ください!
If you recall, I had planned on making Anki flash cards from the large collection of example sentences and short conversations found in The Preparatory Course for The Japanese Language Proficiency Test, Level 4. However, in hindsight I believe there are two problems with this approach:
- It's incredibly time consuming to construct the flash cards
- I'm not sure the range of sentences covers enough vocabulary
If you're also studying for JLPT Level 4 I'm sure you're already well aware of Peter van der Woude's excellent JLPT Study Page which covers not just Level 4 but also Levels 2 and 3. This is a great resource for the official Kanji list and vocabulary that I'm using to help make my flash cards. I'm also a huge fan of the Denshi Jisho web-based dictionary.
With 18 days to go and plenty of work still to do, I have no real idea whether I'll be able to pull this off. The plan is to do as much prep work as possible before taking a look at the past papers from 2004 - 2006 when I have a week to go, which should give me some contingency if these past papers throw up any concerns. がんばって ください!
Thursday, 29 October 2009
Passing JLPT Level 4 in 38 Days
A while ago I (foolishly) signed up for the Japanese Language Proficiency Test Level 4 without actually knowing any Japanese. Counting today, I now have 38 days until the test date, 6th December, and I still don't know any Japanese.
I exaggerate slightly. I've worked my way through about 200 frames of Remembering the Kanji Vol. 1, seemingly the de facto standard for learning the meanings of Japanese characters. I have a decent grasp of kana, thanks to Japanese for Busy People: Kana Workbook, although my ability to read katakana is significantly worse than hirigana. I've also done a couple of chapters of Japanese for Busy People Vol. 1.
The problem is that all of this is scant preparation for the JLPT Level 4. Those 200 kanji I learnt from RTK? Not all of those are going to appear in the test, and there's a sizable number which come later in the book that I haven't had a chance to learn yet. There's also the issue of retention - I learned those kanji a while ago and, mainly due to laziness, have not reviewed them in some time. The major problem with Japanese for Busy People is that it completely avoids teaching you any kanji which is neither realistic nor practical for a test which contains an entire section devoted to character recognition and production.
Fortunately I have two aces up my sleeve. The first is this blog, and this post, which announces my intention to the internet at large (or at least the pitiful fraction who read this site) that I'm going to pass my JLPT Level 4 with only 38 days of preparation. You, dear reader, are going to be holding me accountable for passing. The second is The Preparatory Course for The Japanese Language Proficiency Test, Level 4.
As far as I am concerned, this is the holy grail of JLPT preparation. I mean, the clue's kinda in the title isn't it? This information rich book set me back £36.40 from London's Japan Centre and it's worth every penny. Any Londoners remotely interested in Japanese food, books, manga, tableware, etc. absolutely have to pay the Centre a visit. It's heaven.
So back to TPCFTJLPT4. Consider the following question:
中山さんは 中国語_ できます。
なかやまさんは ちゅうごくご_ できます。
Then there's the English translation:
Nakayama-san can speak Chinese.
The correct particle to use is が and the rule for this is given as:
Use が before できる (can do)
And here's the clincher: the book comes with 2 CDs containg native Japanese readings of just about every single sentence in the book.
Now here's where I'm going to really up my game. Because I'm not just going to study the book. I'm going to combine it with a spaced repetition system (SRS). This is a fancy way of studying flashcards. Essentially you increase the time between viewing previously learnt flashcards in order to exploit the spacing effect - read the Wikipedia articles if you want a proper explaination. A great site for the application of SRS to learning Japanese is All Japanese All The Time which, if I didn't have the JLPT Level 4 test coming up, would be my preferred method of learning Japanese.
Right now I am taking the audio tracks from the TPCFTJLPT4 CDs - they come as 1 track per page - and am splitting them up into individual sentences using mp3splt. Then I'm going to build flashcards using my SRS implementation of choice: Anki. The example sentence given above could be used to make several different cards for instance:
I exaggerate slightly. I've worked my way through about 200 frames of Remembering the Kanji Vol. 1, seemingly the de facto standard for learning the meanings of Japanese characters. I have a decent grasp of kana, thanks to Japanese for Busy People: Kana Workbook, although my ability to read katakana is significantly worse than hirigana. I've also done a couple of chapters of Japanese for Busy People Vol. 1.
The problem is that all of this is scant preparation for the JLPT Level 4. Those 200 kanji I learnt from RTK? Not all of those are going to appear in the test, and there's a sizable number which come later in the book that I haven't had a chance to learn yet. There's also the issue of retention - I learned those kanji a while ago and, mainly due to laziness, have not reviewed them in some time. The major problem with Japanese for Busy People is that it completely avoids teaching you any kanji which is neither realistic nor practical for a test which contains an entire section devoted to character recognition and production.
Fortunately I have two aces up my sleeve. The first is this blog, and this post, which announces my intention to the internet at large (or at least the pitiful fraction who read this site) that I'm going to pass my JLPT Level 4 with only 38 days of preparation. You, dear reader, are going to be holding me accountable for passing. The second is The Preparatory Course for The Japanese Language Proficiency Test, Level 4.
As far as I am concerned, this is the holy grail of JLPT preparation. I mean, the clue's kinda in the title isn't it? This information rich book set me back £36.40 from London's Japan Centre and it's worth every penny. Any Londoners remotely interested in Japanese food, books, manga, tableware, etc. absolutely have to pay the Centre a visit. It's heaven.
So back to TPCFTJLPT4. Consider the following question:
中山さんは 中国語_ できます。
- は
- を
- が
- に
- What do the kanji mean and how are they read?
- What do the words mean?
- What's the general grammatical rule that applies here?
- What does the sentence sound like when read by a native Japanese speaker?
なかやまさんは ちゅうごくご_ できます。
Then there's the English translation:
Nakayama-san can speak Chinese.
The correct particle to use is が and the rule for this is given as:
Use が before できる (can do)
And here's the clincher: the book comes with 2 CDs containg native Japanese readings of just about every single sentence in the book.
Now here's where I'm going to really up my game. Because I'm not just going to study the book. I'm going to combine it with a spaced repetition system (SRS). This is a fancy way of studying flashcards. Essentially you increase the time between viewing previously learnt flashcards in order to exploit the spacing effect - read the Wikipedia articles if you want a proper explaination. A great site for the application of SRS to learning Japanese is All Japanese All The Time which, if I didn't have the JLPT Level 4 test coming up, would be my preferred method of learning Japanese.
Right now I am taking the audio tracks from the TPCFTJLPT4 CDs - they come as 1 track per page - and am splitting them up into individual sentences using mp3splt. Then I'm going to build flashcards using my SRS implementation of choice: Anki. The example sentence given above could be used to make several different cards for instance:
- Question: Japanese text in kanji, no furigana, with the particle filled in. Answer: Japanese text in kana accompanied by native reading. This would test the ability to read the kanji
- Question: Japanese text as above. Answer: English translation. This would test reading comprehension.
- Question: Japanese native reading. Answer: English translation. This would test listening comprehension.
- Question: Japanese text without the particle. Answer: The particle and grammar rule. This would test the grammar rule (i.e. the actual test question)
Tuesday, 27 October 2009
Connecting your Blogger blog with Google Webmaster Tools
I've just hooked up my blog to Google Webmaster Tools and found it to be an entirely unintuitve process so in this post I'll be guiding you through the necessary steps. If you're not familiar with Google Webmaster Tools, they let you investigate how Google (that is, the search engine) "sees" your website - which Google queries are driving visitors to your site and how far up the list of search results you appear for a given query. You'll also be able to see how many users actually click through to your site for that search, and which other sites link to yours.
The reason the process is complicated is because you need to go through a verification step in order to confirm you are, in fact, the site's owner. You do this by editing your Blogger template and adding a "meta" tag. The problem is two-fold: some bloggers won't even know what a meta tag is, and for those that do it's not immediately obvious how to add it to your blog.
We'll tackle the first problem by ignoring it! For the purposes of this guide, you don't need to know what a meta tag is (and frankly I'm probably not in a position to explain it)
To get started, click here to access the Webmaster Tools site. Log in with your Google account and, if you haven't already, sign up to use Webmaster Tools.
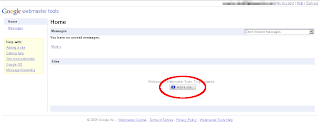
Click the "Add a site..." button as shown below
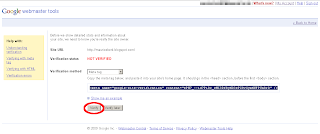
You'll get this popup box asking you to enter the URL of the site you'd like to manage. For example, in my case this is "mauriceberk.blogspot.com". Then click "Continue".

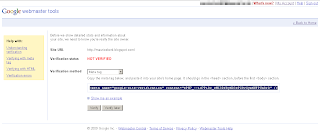
You'll be taken to the following page which lists the URL of the site you're adding, the verification status (as this point: NOT VERIFIED), the verification method which should be "Meta tag" and, below that, the all important meta tag itself. Highlight it and copy it, ready to paste into your Blogger template.
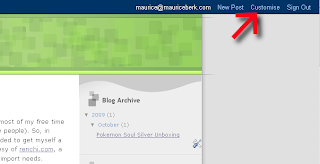
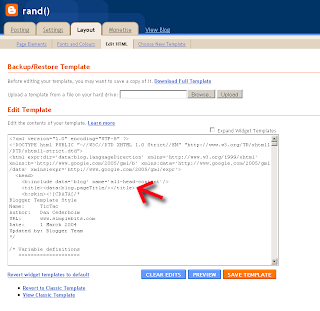
Back to Blogger. Assuming you're viewing your blog, click on the "Customise" link in the top right corner
You'll then be presented with the following screen. Click on "Edit HTML"
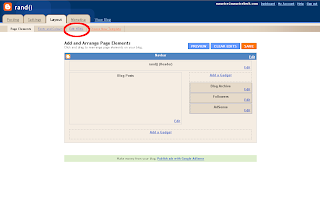
You'll now be editing your Blogger template. Look for the closing tag "/title". Directly after this is a good place to paste your meta tag. Once you've pasted it, click on "Save template".
Now go back to Webmaster Tools and click on "Verify". And we're done!
If for whatever reason it didn't work, or any of the steps are unclear, please leave a comment and I'll do my best to resolve your issues. While you're at it, consider signing up for Google Analytics as well, which will allow you to track, in the detail, the number of people visiting your blog, how long they spend on the site, how many pages they read, etc.
The reason the process is complicated is because you need to go through a verification step in order to confirm you are, in fact, the site's owner. You do this by editing your Blogger template and adding a "meta" tag. The problem is two-fold: some bloggers won't even know what a meta tag is, and for those that do it's not immediately obvious how to add it to your blog.
We'll tackle the first problem by ignoring it! For the purposes of this guide, you don't need to know what a meta tag is (and frankly I'm probably not in a position to explain it)
To get started, click here to access the Webmaster Tools site. Log in with your Google account and, if you haven't already, sign up to use Webmaster Tools.
Click the "Add a site..." button as shown below

You'll get this popup box asking you to enter the URL of the site you'd like to manage. For example, in my case this is "mauriceberk.blogspot.com". Then click "Continue".

You'll be taken to the following page which lists the URL of the site you're adding, the verification status (as this point: NOT VERIFIED), the verification method which should be "Meta tag" and, below that, the all important meta tag itself. Highlight it and copy it, ready to paste into your Blogger template.

Back to Blogger. Assuming you're viewing your blog, click on the "Customise" link in the top right corner

You'll then be presented with the following screen. Click on "Edit HTML"

You'll now be editing your Blogger template. Look for the closing tag "/title". Directly after this is a good place to paste your meta tag. Once you've pasted it, click on "Save template".

Now go back to Webmaster Tools and click on "Verify". And we're done!

If for whatever reason it didn't work, or any of the steps are unclear, please leave a comment and I'll do my best to resolve your issues. While you're at it, consider signing up for Google Analytics as well, which will allow you to track, in the detail, the number of people visiting your blog, how long they spend on the site, how many pages they read, etc.
Monday, 12 October 2009
Pokemon Soul Silver Unboxing
I'm learning Japanese. I also happen to spend most of my free time playing computer games (Yes, I'm one of those people). So, in order to learn Japanese while having fun I decided to get myself a copy of Pokemon Soul Silver for the DS, courtesy of renchi.com, a Hong Kong based games retailer for all of your import needs.
Total cost, including express FedEx shipping was about $80 (US) and, shockingly, it was delivered on a Sunday. I've used renchi in the past (for the delectable Demon's Souls) and it comes highly recommended (And for the record, I don't get any kind of refferal points!)
As my old maths teacher used to say - enough of this faggotry. On with the unboxing...

Front of the box. Thanks to my poor photography skills you're unable to fully appreciate the shiny, textured, beautifully illustrated background. Note the Pokewalker in the bottom right hand corner.

Back of the box. All of the Kanji that's part of the game description is annotated with furigana, small Japanese characters which tell the reader how to pronounce it. This is a good sign for me, who can recognize very few Kanji, and read less than that.

Inside the box. On the left hand side is a standard DS game box, wrapped in cellophane. On the right hand side is the Pokewalker, with the instructions on how to use it in the middle.

Up close and personal with the Pokewalker. Initial impression are great - it feels solid and well made.

Bottom of the Pokewalker, from the back. There's one of those clip things from which you could hang a mobile phone charm (of Pikachu, of course)

The top of the Pokewalker, from the back, showing off the infrared sensor. For those who don't know, the idea is that when you're not playing the actual game, you store a Pokemon on the Pokewalker who levels up according to how many steps you take.

The package includes an alternative back for the Pokewalker. From the illustations in the instructions, it's a simple case of removing one screw in order to change the back. This one includes a handy belt clip.

Inside the box proper. Lots of incomprehensible literature and the game cartridge itself.

View of the cartridge from the top, where the infrared transmitter is placed. If you didn't already know it was there it's almost impossible to tell the difference between this and a normal cartridge.

Fun looking stuff that I can't read. Yet. On the left it looks like you can collect points for phat Pokemon lewt and on the right looks like a combined advertisement for the Pokemon World Championships 2010, and some Pokemon game for the Wii.

Inside the manual. Again, there's plenty of furigana to help younger Japanese readers out. The manual has a nice feel to it - it's not glossy but as you can see it's bright and colorful.
Next up: gameplay impressions!
Subscribe to:
Posts (Atom)